Motivation
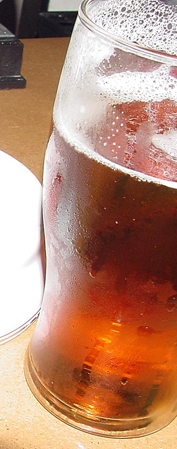
The idea is simple; we want to render a cup of drink. Besides a volumetric liquid and a glass, we want to model and render the haze on the glass surface (many small globs make the surface translucent), and if possible, model and render the foam on the surface of the liquid (released carbon dioxide). The figure on the left is a real photo we want to achieve.
Multiple Scattering Volume Rendering
Obviously photon mapping is the best method to render the multiple scattering effects [Jensen98]. It can render most materials correctly; other methods can only deal with specified cases. However, the flow of pbrt makes multiple scattering hard to implement. The surface and volume are processed independently. To overcome this problem, we modify the core classes. The volume photon map is stored in scene. In this way preprocess() in the surface integrator can store the volume photons, and the volume integrator can access them.
Our scene is not filled with liquid, so the implementation is different to those for underwater rendering. When light ray hits the volume, we assume that interaction must happen after a random distance (according to extinction coefficients). At the interaction point, the light ray is scattered to a new direction or absorbed according to the ratio of scattering and absorbing coefficients. If we do not enforce the interaction, we will not have enough volume photons in most cases. We correct this bias by modifying the coefficients. We assume the light ray leaving the volume remains a specular path if it was before entering the volume.
We further implement the extended photon map [Pharr05] (not simply copy and paste). There are many concerns are dealt with in the extended version. Therefore, the noise is greatly suppressed. However, for some unknown reasons the final gathering becomes much noisier so we turn it off in our rendering.
Also the original definition of volume is not enough for our application. We declare two new member functions: SampleScattering() and Inside(). We also implement some volumes of different shapes, such as clipped cone and cylinder.
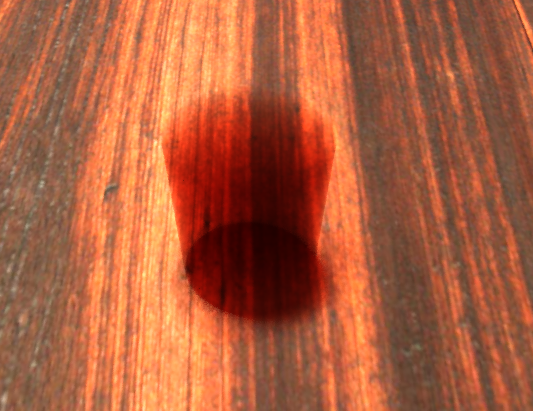
The figure below contains a ground, 2 area light sources, and a multiple scattering clipped cone volume. We can also see the colored shadow of the volume. We only shot 100,000 photons and cast 2 eye rays per pixel. The total rendering time is 24 seconds on a PC with an Intel Core 2 CPU. Amazingly the image is very smooth.
Hazed Glass
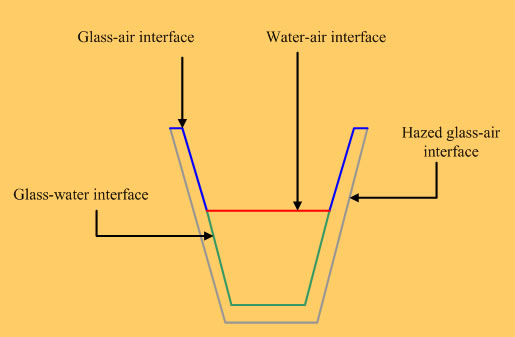
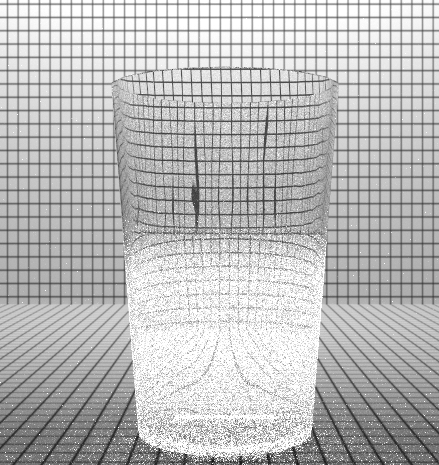
We separate the glass cup model into several parts: glass-air interface, hazed glass-air interface, glass-water interface, and water interface. We tried using the polygon to model the cup. However, the discreteness of the surface normal is obvious. Therefore, we wrote a cup generator to modeling cup using cones and disks. The cone plug-in is modified to fit our need.
Each part has its own incident refraction index and transmission refraction index. We create refraction module based on the glass module of pbrt to let user define arbitrary incident and transmission refraction indices. When the drink is iced, water particles in the air will gather together and attach to the surface of the glass cup. We simulate this phenomenon by using modified translucent material. The modified translucent material is more similar to the hazed glass. It preserves more transparency and let user use texture to define transparency. Thus, the transition between glass-air and hazed glass-air interfaces are smoother. The modified translucent material returns the BSDF of either the translucent material or the refraction material. The probability of the choice is determined by the input texture. The figure below is our result. We can specify the haze region.
Result
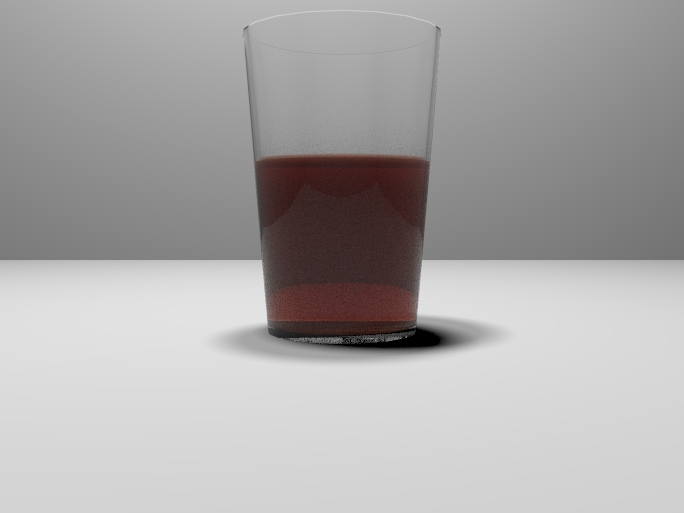
The first scene contains 2 light sources, a glass of wine. We shot 400000 photons and 32 eye rays. The rendering time is 6600 seconds. The overall appearance is pretty convincing. We can see the volumetric effect of the liquid, and the little caustic effect in the shadow.
Some black regions at the bottom of the glass are due to total reflection. It requires very long traverse depth to make them illuminated. We can not explain some unexpected effects. First, the haze of the cup is only visible when the reflection is strong. Second, the shadow is colorless, while some photons in that region are indeed red.
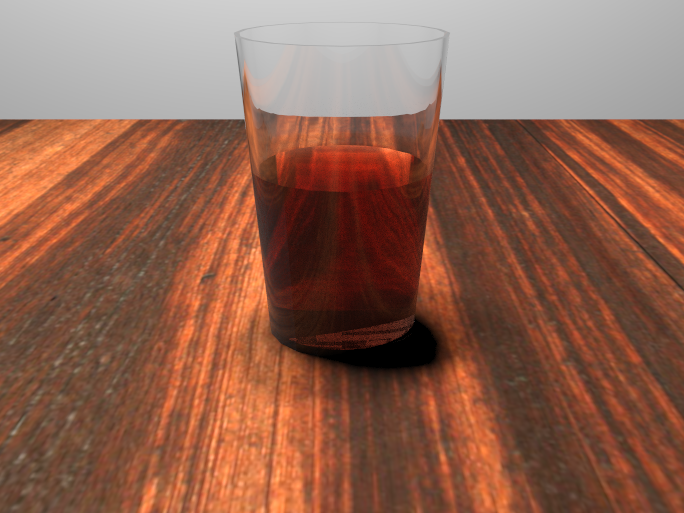
In the second example we place a texture on the desk and change the view point. We increase the eye rays to 512 and the rendering took 8 hours. We can see the refraction on the glass. However, the haze on the surface becomes less visible. People may think the reflection of the glass is too strong, but it is physically correct. In the real life we are used to ignore (defocus) those details on the glass.
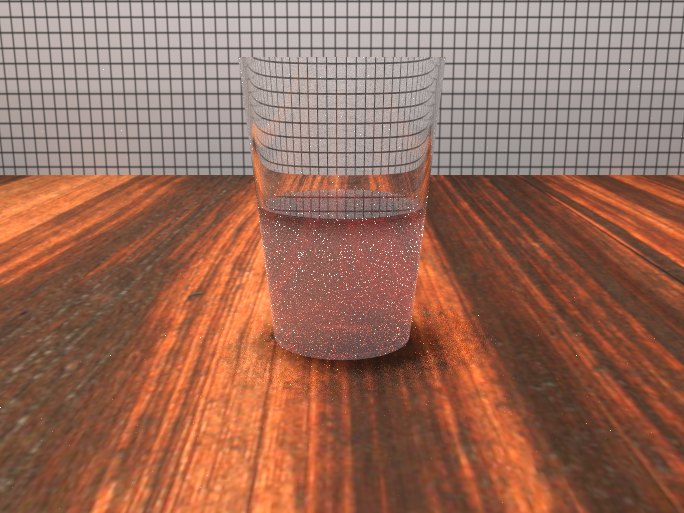
We also use path-tracing to render the scene. The haze becomes much more visible and also the reflection becomes much stronger. Even with 1024 eye rays the noise is still very serious.
Discussion
Photonmap or path tracing?
We find when using photon map, the microscopic haze effect is substantially suppressed. It is because photon gathering is a low pass filter. To emphasize the haze, path tracing must be applied. However, it is hard to converge and it can not generate multiple scattering effects.
Failure in foam
We tried many ways to synthesize the foam on the fluid surface (The most complex one is 3D Poisson sampling plus relaxation). However, all our attempts failed to generate a realistic result. It is because the foam of the soft drink is quiet different to soap bubble. Besides the physical simulation is difficult, the number of bubbles is more than 100k (estimated from the photo), which makes the ray-surface intersection computationally prohibitive.
Although we can not render the foam, many observations in our experiments should be useful. We hope they can inspire other talented people. First, the bubbles are ball-shaped in most cases and sometimes a little distorted. In contrast, soap bubbles usually cluster and share the surface. Second, the average radius of bubbles is proportional to their distance to the liquid surface. We can not assign the radius of the bubble uniformly. Third, the shell of foam is thick. The percentage of the liquid and air in the bubble volume are comparable. Fourth, one the top surface of the bubble volume is smooth. Liquid fills the gaps between bubbles.
Overall experience
We met many problems in these project, and most of time we solve them together. We learnt many things from this project. It is really enjoyable.
We feel pity that we spent too much time on programming and did not have enough time to build a good model and scene. Haze is a microscopic effect and hard to converge in simulation. Therefore we wasted a lot of time on tuning the haze parameters. Also in the last minute we find that caustics require high curvature, but we do not have more time to make new models. We can not find the reason why there is shadow for a transparent object. We guess it is due to the wrong assignment of normals and insufficient knowledge of visibility in pbrt.
Downloads
The whole pbrt package is available [here]. We modified many codes in the projects core, cone, and render. We add some projects: globtex, volumecylinder, homogeneouscylinder, homogeneouscone, volumephotonmap, and multiple.
The scene description and rendered results are available [here].
References
- H. W. Jensen and P. H. Christensen: "Efficient simulation of light transport in scenes with participating media using photon maps," In Proc. SIGGRAPH'98, pages 311-320, Orlando, July 1998.
- Matt Pharr, "Improved photon mapping integrator," 2005.
- Kayvon Fatahalian and Tim Foley, "Rendering Jellyfish."
- Sean Rosenbaum and Mattias Bergbom, "Foam."
- Khai Weyn Ong, "Martinis."
- Chris Hong and Garrett Smith, "Underwater."